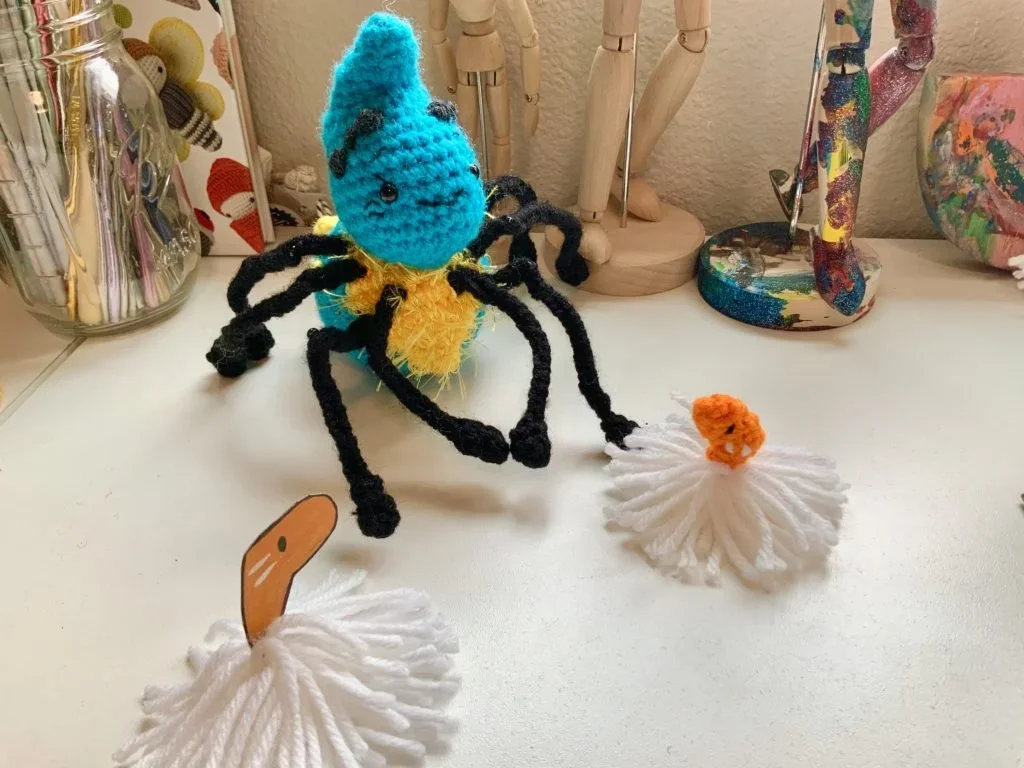
Crochet a Whimsy + Flit Plushie!
from the children’s book series by J.H. Winter, TALES OF WHIMSY

Image Courtesy of Crochet Now! magazine from a feature they did on my book, WISHWEAVER.
Materials Needed:
Crochet Hook: 3.5
6mm Safety Eyes
Stitch marker
Here is a list of the yarns I used: 4-weight acrylic
- Red Heart Super Saver Solids - Turqua (A)
- Red Heart Super Saver Solids - Gold (B)
- Lion Brand Fun Fur - Bright Yellow (C)
- Red Heart Super Saver Solids - Bright Yellow (D)
- Red Heart Super Saver Solids - Black (E)
- Scraps of Red Heart Super Saver Charcoal Black (F) and Red Heart SS White (G),
- Red Heart Super Saver - Pumpkin (H)Yarn Needle
Embroidery Needle
Black Embroidery Thread
12-gauge Black Jewelry Wire
Wire Cutters/Pliers
Toy Stuffing (Polyester Fiberfill)
VIDEO TUTORIALS
Right-Handed Tutorial:
This tutorial video will show you how to make Whimsy and her pal, Flit, from start to finish. If you are new to crochet, feel free to check out my Playlist of videos on how to make each crochet stitch or just dive right in. I always show you how to do the stitches, but if you need more practice, this Playlist will help guide you through each of the stitches needed to make amigurumi.
Written Pattern - Whimsy
Download the PDF Pattern to follow along or continue going through the pattern below. PDF includes full Photo Tutorial.
Hints and Tips for Whimsy:
1. Use tail from Head to sew to Chest Piece, and then to Body.
2. For more spindly spider legs, you can keep them as black jewelry wire.
Note: Whimsy and Flit are worked in the amigurumi style, in a spiral without slip stitching or turning chains. Use a st marker or waste yarn to keep track of the first st of each rnd.
Head (with color A):
R1: 5sc in m.r. – 5
R2: inc around – 10
R3: (sc, inc) around – 15
R4: (2sc, inc) around – 20
R5: (3sc, inc) around – 25
R6-10: sc around – 25
R11: 7sc, (invdec, 2sc) 3 times, 6sc – 22
R12: 7sc, (invdec, sc) 3 times, 6sc – 19
R13: 7sc, (invdec) 3 times, 6sc – 16
Attach 6mm eyes between R7-8 of Head. Embroider cheek marks + eyebrows using 3 strands of embroidery thread. Embroider mouth + eyelashes using the full 6 strands of embroidery thread. Using 2-3 strands of embroidery thread, you will take some shaping stitches to pull the mouth into the shape that you’d like.
R14: 2invdec, 8sc, 2invdec – 12
Begin Stuffing
R15: 5sc, 2inc, 5sc – 14
R16: invdec, 4sc, 2inc, 4sc, invdec – 14
R17: 2invdec, 3sc, inc, 2sc, 2invdec – 11
R18: invdec, 9sc – 10 Finish Stuffing Whimsy Pattern
R19: 2invdec, 2sc, 2invdec – 6
Slst to next, weave long tail through remaining 6 stitches in the FLO to close. Use same tail to take a tuck around R14-15 so that the pointed head curves forward like a crescent moon. Put yarn needle through to the base of the head where it will connect to the chest and set aside for now.
Body (with A):
R1: 6sc in m.r. – 6
R2: inc around – 12
R3: (sc, inc) around – 18
R4: sc around – 18
R5: (2sc, inc) around – 24
R6: sc around – 24
R7: (3sc, inc) around – 30
R8: sc around – 30
R9: (4sc, inc) around – 36
R10: sc around – 36
R11: (5sc, inc) around – 42
R12-14: sc around – 42
R15: (5sc, invdec) around – 36
R16: sc around – 36
R17: (4sc, invdec) around – 30
R18: sc around – 30
R19: (3sc, invdec) around – 24
Begin stuffing
R20: (2sc, invdec) around – 18
R21: (sc, invdec) around – 12
Finish stuffing
R22: invdec around – 6
Slst to next, weave tail through remaining 6 stitches in the FLO to close. FO, weave in end.
Chest (Hold one strand of B & C working stitches together):
R1: 4sc in m.r. – 4
R2: (sc, inc) around – 6
R3: (2sc, inc) around – 8
R4: (sc, inc) around – 12
R5: (sc, inc) around – 18
R6: sc around – 18
R7: (8sc, inc) around – 20
R8: sc around – 20
R9: (3sc, invdec) around – 16
R10: (2sc, invdec) around – 12
Lightly stuff around middle. Leave top unstuffed for head to be sewn down to later.
R11: (sc, invdec) around – 8
Slst to next, weave tail through remaining 6 stitches in the FLO to close. FO, weave in end. You can take a brush or your yarn needle to pull out more of the fun fur that is tucked inside the chest piece if you want the chest furrier. I did not do this on my own. I liked how it looked as is.
Large Back Spots (Make 3 with D):
R1: 5sc in m.r. – 5
R2: inc, 2sc, inc, sc – 7
FO, leave tail to stitch to back.
Medium Back Spots (Make 4 with D):
R1: 5sc in m.r. – 5
FO, leave tail to stitch to back.
Small Back Spots (Make 6 with D):
These are French knots made with a yarn needle.
Hands (Make 8 with E):
R1: 4sc in m.r. – 4
R2: sc around – 4
FO, leave tail to sew to the end of the leg chains.
Written Pattern - Flit
** If you’d rather make a quicker Paper & Yarn Flit, head on over to this Paper Craft!**
Seed Head (wit H):
R1: 4sc in m.r. – 4
R2: (sc, inc) around – 6
R3: sc around – 6
R4-5: invdec, 2inc, invdec – 6
Using black yarn embroider eyes. Do the same for the cheek lines with a strand of white yarn.
R6: invdec around – 3
FO, leave tail to sew head to body.
Skirt (with G):
Make a pompom with white yarn.